Last Updated on June 16, 2026
Today I’m teach you how to grow broccoli sprouts at home so you can soak in all of the incredible health benefits they contain and save money in the process.
Broccoli sprouts are all the rage in the health, healing, and holistic fitness worlds, and for good reason!
Broccoli sprouts are incredibly nutritious, stimulate gene expression, and contain virtually no calories. Healthy gene expression is mandatory for optimal health and metabolism. When your genes are activated and functioning properly it’s a lot easier to lose weight. (Fun fact: ALL of my meal plans were developed using proven methods of epigentics and nutrigenomics to use food to activate gene expression. That’s why they work so well and quickly!)
The problem? They’re damn near impossible to find in grocery and health food stores which is why I’m showing you how can you grow your own broccoli sprouts at home. It’s so easy to sprout them, is very cost-effective, and is one of the best things you can do for your health. When you can find broccoli sprouts in store a tiny package can set you back up to $5 for 4 servings.
I’m going to show you how easy it is to grow broccoli sprouts right in your own kitchen…without any fancy equipment or anything overly complicated or expensive. My sprouting method will save you money, too. The cost is approx $.20/serving. which is a STEAL considering all of the benefits you’ll get from raw broccoli sprouts.
Throughout this tutorial, I’ll address everything you need to know to sprout broccoli seeds confidently and quickly so you can have a constant supply on hand like me. I do NOT have a green thumb and have had nonstop success sprouting broccoli so I’m passing all of my sprouting tips and tricks on to you.
But before I do you’re probably wondering “What the heck are broccoli sprouts and why in the world do I need to be eating them.” When I first learned about them I thought the same but after learning about them I couldn’t wait to start sprouting and eating them nonstop… so let’s dig in.

What are Broccoli Sprouts?
Broccoli sprouts are the baby, seedling version of mature, tree-like broccoli you’re used to seeing and eating. I had no idea broccoli came from sprouts, but they do.
To make broccoli sprouts you simply sprout the seeds in a jar, not in soil. Which is what I’m going to teach you how to do. But first, you may be wondering why the heck would I want to sprout broccoli seeds… I got you covered.
Why Are Broccoli Sprouts Good For You?
Fully developed broccoli is packed with Vitamin C. It’s also a great source of fiber, Vitamins A, and B6. It’s common to think that because broccoli sprouts aren’t fully developed that they wouldn’t have as much nutritional content. And it’s true that they don’t have as much vitamin content BUT broccoli sprouts are packed with huge concentrations of sulforaphane which stimulates NRF2 activity better than most anything else.
In fact, broccoli sprouts contain 100 times more beneficial properties for health & anti-cancer benefits than their mature counterparts.
When NRF2 activity is stimulated over 200 anti-inflammatory and anti-oxidant genes are turned on and go to work to help the body function at optimal levels. (Source) This helps reverse any damage done, prevent cancer, and extend the mortality of those who already have cancer because they’ve been proven to slow the doubling time of cancer cells.
Broccoli sprouts are one of the best foods you can eat to prevent age-related diseases, cancer, and cancer deaths due to the compound sulforaphane.
Sulforaphane is a sulfur-rich compound found in cruciferous vegetables like broccoli, bok choy, and cabbage, cauliflower, and Brussels sprouts. It’s found in higher concentrations in broccoli sprouts. (Source)
Sulforaphane is released when glucoraphanin comes into contact with myrosinase. Myrosinase is a family of enzymes that facilitate the defense response of plants.
Myrosinase enzymes can only be released and activated when a plant is damaged. Meaning cruciferous veggies must be cut, chopped, or chewed to release myrosinase and activate sulforaphane. (Source)
Consumption of cruciferous veggies has proven beneficial effects on cancer, mortality, aging, brain and behavior, heart disease & more. They also help the body eliminate toxic compounds from cells faster as they heal damage. Again, broccoli sprouts contain 100 times more benefits compared to their mature counterparts.
For more info about the benefits check out this video from Dr. Rhonda Patrick. LOVE HER!
How many broccoli spouts should I eat for the most benefits?
To get the most benefits broccoli sprouts are best raw and well chewed. Cooking kills the beneficial compounds so don’t you dare cook them. Any broccoli sprouts are better than none BUT at a minimum, I recommend having a few tablespoons a day – approx. 1/4 cup max. I personally eat a tablespoon per meal throughout the day and when I can’t I’ll have the full 1/4 cup serving at breakfast.
DO NOT eat a TON thinking you’ll get more benefits.
The isothiocyanates found in broccoli sprouts can be toxic to the digestive tract and can cause issues if over-eaten. If you experience diarrhea, digestive issues, or headaches after eating a small amount of broccoli sprouts that means you’re overly toxic.
In this case, I’d recommend my Reset Cleanse immediately. After, then proceed with a small amount of broccoli sprouts daily. I personally started eating broccoli sprouts after doing my Reset Cleanse to prevent issues and to help ensure proper absorption of the beneficial compounds.
How to eat broccoli sprouts?
I put raw broccoli sprouts on my salads, in green smoothies, wraps, and on my omelets. I try to eat some with every meal. I’ve also been know to eat a forkful throughout the day as a micro snack that acts like a supplement.
They have a very mild broccoli taste and I find that they aren’t as strong as fully grown broccoli. I also make a conscious effort to chew them very well because that helps release the beneficial compounds into the body better.

Broccoli Sprout Supplements
Speaking of supplements, yes, you can supplement with sulforaphane in pill form. But supplements aren’t as pure as raw broccoli sprouts, nor do they contain the same potency. Fresh and raw broccoli sprouts are best. But something is better than nothing. So if you don’t want to sprout broccoli, I’d recommend supplementing at the very least.
From all of my research, this supplement is the best and comes from a well-established company known for purity & potency. Their formulation is patented, too. This supplement has the safest amount of compounds I’ve found compared to others I’ve seen.
HOW TO GROW BROCCOLI SPROUTS AT HOME
Now that you know why they’re so beneficial, important, and that a little goes a long way, it makes sense that we don’t have to sprout a TON of broccoli seeds to get started.
I like to start with one jar, then start a new jaw a few days later. This rolling sprouting schedule ensures that you’ll always have broccoli sprouts on hand, that you won’t lose any due to waste, and can avoid issues. That being said there are some potential issues that can come up when trying to sprout broccoli seeds.
But don’t worry!
The method I’ve been using has worked every time. I haven’t had any issues but there is a risk involved which is contamination and mold… so before we dig into the steps let’s quickly review the risks because it’s important to know what to look out for as your sprouts are maturing and what’s totally normal.

Broccoli Sprout Contamination & Mold Warning
All sprouts are delicate and can rot and mold if you’re not able to tend to them. You’ll need to wash the sprouts twice a day for 5-7 days as they’re sprouting. So you want to make sure you’re able to tend to them for a week – morning at night. You definitely don’t want to start a batch and ignore them or leave town.
It’s also important to work in a sanitary environment so all of your sprouting equipment and hands should be clean before getting started. It’s also incredibly important that your sprouts are as dry as possible during the sprouting and storing process. Too much moisture left in the sprouting jar can result in mold or for the sprouts to rot. But don’t worry – I’ll show you how to avoid issues. I live in a SUPER humid environment and I’ve never had an issue.
Oh, and the easiest way to tell if there’s an issue is to smell the sprouts in the jar. Take a whiff and you should be able to smell a mild broccoli smell. If you smell anything musty, spoiled, or rank it’s best to cut your losses and start over with a new batch. Any fishy smells means that the seeds/sprouts were sitting in water for too long.

BROCCOLI SPROUTING EQUIPMENT
Broccoli sprouting equipment is super cheap. There are fancy sprouting kits but there’s no need for any of that. In fact, you probably have some of the equipment you need to sprout broccoli in your house right now. You can repurpose most of it, too – so you’re not going to have a bunch of unnecessary single-use equipment laying around either.
To sprout broccoli you will need:
- Glass ‘Tupperware’ container (I use this set – and the 35 oz rectangles for sprouting)
- Filtered Water
- Organic broccoli seeds (This is what I use) It’s imperative that you use organic sprouting seeds for this!!!
- Quart or 16 oz. sized Mason jars (with lids) I got these 16 oz mason jars to sprout and also to drink out of.
- Wide-mouth or 16 oz. sprouting jar lids (they’re just like the mason jar lids that come with the jars, except sprouting jar lids have a mesh screen (see the ones I use for my 16 oz jars)
- These 32 oz. quart size jars work too. Here are the wide-mouth mesh lids you’ll need if you go with 32 oz. quart-sized jars
EASY STEPS TO GROW BROCCOLI SPROUTS
The first step is to soak your broccoli seeds for approximately 8 hours or overnight. This helps neutralize the seed’s coating so it can sprout easier. Don’t skip this step. This will be the only time your seeds will be sitting in water. After this step, it’s important to drain the jars so that your seeds and budding sprouts don’t sit in any water… but that’s what the glass container is for.

Step 1: Soak your Broccoli Sprout Seeds
- If you’re using a 16 oz jar – Add one tablespoon of broccoli seeds to the Mason jar. If you add too many seeds to a 16 oz jar they’ll be hard to get out of the jar.
- If you’re using a 32 oz jar – Add two tablespoons of broccoli seeds to the Mason jar.
- Regardless of the jar size – you’ll need to fill the jar halfway with water.
- Then put the mesh lid on.
- Let the jar sit for 8 hours or overnight. The jar should be at room temperature. I put mine on my kitchen counter overnight.
- After 8 hours, pour off the water then give the seeds a good rinse. After you’re done drain the jar completely. Try to shake out as much water as possible.
- Next, flip your jar upside down at an angle in your glass tupperware. This upside-down, angled position will allow the moisture to continue to drain. After you’re done, place the jar setup in a dark cabinet.

Step 2: Rinse your Broccoli Sprouts
Your seeds will start to split 12-24 hours after they’re soaked. Sprouting has officially started. Woo!
You’ll need to rinse your seeds 2 – 3 times a day then drain them and return, then upside down & angled in the cabinet. I do this in the morning & again before I go to bed. I’ve never rinsed my sprouts 3 times.
- To rinse: Fill the jar with fresh water, spin it around, and pour the water out through the mesh lid. Get out as much water as possible then place the jar back in the cabinet in your tupperware upside down and at an angle.

Step 3: Sprout your Broccoli Sprout Seeds
Repeat the rinse, drain, store, and repeat the pattern twice a day. The seeds will sprout at different times.
- Around 3 – 4 days your broccoli sprouts will start developing fuzzy fiber-like ‘hairs’. Don’t worry! This is normal and isn’t mold. This is what they look like…

- By 5 – 7 days, your sprouts will be grown enough so that they’ve filled the jar. Once your sprouts have filled the jar you can set them – upside down in a sunny, room temperature spot. This will help them turn green.
Step 4: Store your Broccoli Sprouts
- Be sure your sprouts are dry before you refrigerate them. You can use a salad spinner. I clean my hands then blot them with paper towels. Next I put the fresh spouts in a clean glass, tupperware container. You can also change from a mesh lid to a normal mason jar lid if you want.
- Refrigerate your sprouts for up to 5 days.
- I start sprouting another jar as soon as I finish one so I’ll have a neverending supply of broccoli sprouts on hand.

I do NOT have a green thumb and was intimidated by this process in the beginning. But I’ve been sprouting broccoli for months now and it’s become an effortless part of my routine that I truly enjoy.
After one round it’s very straightforward and feels like second nature. This is also a fun activity to do with kids.
I encourage you to try it. If you’re going to sprout seeds or have any questions – let me know in the comments.
Your Coach and Biggest Cheerleader –
![]()
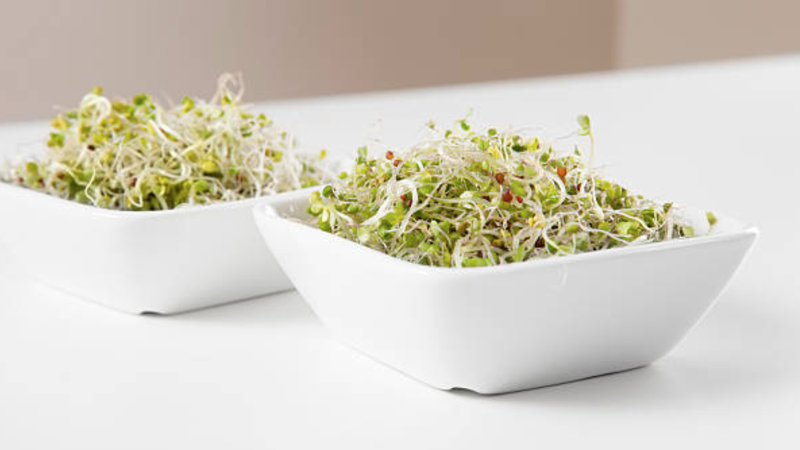
Broccoli Sprouts
EQUIPMENT
- Filtered Water
- 1 tbsp Organic broccoli seeds (This is what I use) It’s imperative that you use organic sprouting seeds for this!!!
- 1 16 oz. sized Mason jars (with lids) I got these 16 oz mason jars to sprout and also to drink out of.
- 1 16 oz. sprouting jar lid (they’re just like the mason jar lids that come with the jars, except sprouting jar lids have a mesh screen (see the ones I use for my 16 oz jars)
Instructions
STEP 1: SOAK YOUR BROCCOLI SPROUT SEEDS
- If you’re using a 16 oz jar – Add one tablespoon of broccoli seeds to the Mason jar. If you add too many seeds to a 16 oz jar they’ll be hard to get out of the jar.If you’re using a 32 oz jar – Add two tablespoons of broccoli seeds to the Mason jar.
- Regardless of the jar size – you’ll need to fill the jar halfway with water. Then put the mesh lid on.
- Let the jar sit for 8 hours or overnight. The jar should be at room temperature. I put mine on my kitchen counter overnight.
- After 8 hours, pour off the water then give the seeds a good rinse. After you’re done drain the jar completely. Try to shake out as much water as possible.
- Next, flip your jar upside down at an angle in your glass tupperware. This upside-down, angled position will allow the moisture to continue to drain. After you’re done, place the jar setup in a dark cabinet.
STEP 2: RINSE YOUR SPROUTS AND REPEAT
- Your seeds will start to split 12-24 hours after they’re soaked. Sprouting has officially started.You’ll need to rinse your seeds 2 – 3 times a day then drain them and return, then upside down & angled in the cabinet. I do this in the morning & again before I go to bed. I’ve never rinsed my sprouts 3 times.
- Repeat the rinse, drain, store, repeat pattern twice a day.
- To rinse: Fill the jar with fresh water, spin it around, and pour the water out through the mesh lid. Get out as much water as possible then place the jar back in the cabinet in your tupperware upside down and at an angle.
STEP 3: SPROUT
- Around day 3 your broccoli sprouts will start developing fuzzy fiber-like ‘hairs’. Don’t worry! This is normal and isn’t mold.
- By day 5 – 7, your sprouts will be grown enough so that they’ve filled the jar.
STEP 4: STORE YOUR BROCCOLI SPROUTS
- Be sure your sprouts are dry before you refrigerate them. You can use a salad spinner. I clean my hands then blot them with paper towels. Next I put the fresh spouts in a clean glass, tupperware container. You can also change from a mesh lid to a normal mason jar lid if you want.
- Refrigerate your sprouts for up to 5 days.
Don’t forget to pin this tutorial to Pinterest so you’ll have it forever

Metabolic Type Meal Plan Results
Eating Healthy But Not Seeing Results?
The solution is eating for your unique metabolic type - When you eat foods that match your Metabolic Type you can lose weight and feel great 3 times faster. Take the Metabolic Type Quiz to discover your type and the meal plan that's best for you.
TAKE THE QUIZ
If you liked this post you’ll also like:

Dr. Christina Carlyle is a Doctor of Functional Medicine, FDN-P, Nutritionist, & Trainer who transformed her body and health – getting off 7 medications and losing 40 pounds for good. Now, she helps other women get happy, healthy, and fit – quickly & naturally – without any BS